Learn more about sail trim with either NauticEd’s FREE Basic Sail Trim Course for any aspiring sailor, or learn more comprehensive techniques with the Advanced Sail Trim online course.
The 8(ish) Most Important Sailing Knots
How to tie a good sailing knot and become the captain’s favorite
Knots and sailing are really tied together — I couldn’t help myself. If you sail, you absolutely need to know how to tie sailing knots and tie them well. This is the kind of skill you will use constantly and can practice really easily when you’re not on the water. In fact, there’s really no excuse for not knowing how to tie knots because you can practice while watching TV (or your favorite sailing movie).
Of course, tying a good knot is important for securing all kinds of things while you’re sailing and though a knot staying tied is obviously the goal, how easily a knot can be untied is really what makes it a good knot. Messy knots tied incorrectly over and over can be dangerous because in sailing, as quickly as you need to be able to tie some knots, you need to be able to untie other knots.
Anyone who sails likely has countless stories about knot mishaps (and we want to hear about them), but here’s a knot-related blunder when a stopper knot (or lack thereof) created an embarrassing call back to the Moorings Base.
There are a ton of sailing knots you can learn and use, but many find the options a little daunting. The truth is that there are a handful of knots that are especially helpful and most of these are actually the easy ones. Below are what we would consider to be the first 8 sailing knots you need to master (with two bonuses at the end).
Need a quick gift idea for the sailor in your life? Sailing education bundles (or single courses) make for perfect last-minute gift ideas. You can gain access instantly and if you wrap up a book on knots with some rope along with it, they will be all set!
Knot Basic Components
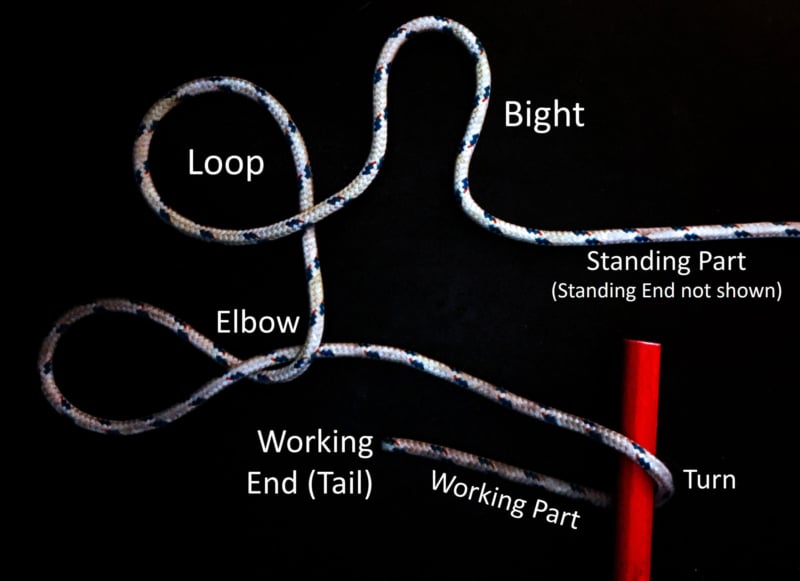
Like most things in sailing, there’s a name for practically everything! When learning knots and following directions, you’ll likely come across these basic terms (beginning with the Standing Part in the diagram):
- Standing End (not pictured): the end of the line not involved in the knot.
- Standing Part: simply the section of line between the knot and the Standing End (i.e., the rest of the unused line).
- Bight: a fold or U-shaped part of the line used in making a knot.
- Loop: a full circle formed by passing the line over itself.
- Elbow: two crossing points created with an extra twist in a Loop.
- Turn: a single pass around or through an object. *Note: a “Round Turn” is a complete wrap/encirclement around an object (i.e., 2 passes).
- Working Part: the section between the knot and the Working End.
- Working End: the end of the line used when making a knot. Also called a “Tail” or “Running End”.
Click to enlarge
8 Most Common Sailing Knots for Beginner Sailors
*Caution: some modern line materials (such as polypropylene, Spectra, or Dyeema) may be slippery, so much so that these basic knots may not perform as intended. For those materials we recommend testing as well as researching alternative knots…
Cleat Hitch:
The longer you sail, the more cleat hitches become second nature. You use them constantly to secure lines to cleats, such as dock lines and halyards. To tie one, you will go around the base of your cleat with your line, then come up and across the cleat, under one horn, and then before going over to go around the other horn, you make a loop with the working end under so that when you hook that loop on the other horn, the line is underneath. One quick note about this knot is that because you’ll be tying it in multiple places, you need to remember to always start going around the base of the cleat on the opposite horn to where your line is coming from.
Tip: a common mistake with tying a cleat hitch is overdoing it! It’s important that you be able to undo a cleat hitch quickly, whether it’s docking or a halyard/sheet. So don’t overdo it! Seriously, most experienced sailors will attest to when you need to undo a cleat hitch, you really need to undo it quickly.
Reef Knot/Square Knot:
Also a common knot for non-sailors, this knot involves taking two line ends, crossing the left over the right and twist. Then do the same thing, but right over left. This is called a reef knot in sailing because it’s used to reef sails.
*Note: if you do left over right and then left over right again, it’s called a Granny Knot (which is a little insulting to grannies because this is a terrible knot).
A double-slipped reef/square knot is otherwise known as a bow knot. You may recognize it from your shoelaces or all of the gifts you’re likely wrapping right now. We should mention that this knot can’t carry a significant load, so consider it for your holiday wrapping, but not for holding anything heavy.
Sheet Bend:
If you need to tie two lines together and they are different sizes/weights, you can use a sheet bend. This is quite similar to the Reef Knot, but better for combining dissimilar lines. Notably, many experienced sailors prefer the Sheet Bend to the Reef/Square Knot.
Make a loop with the bigger/thicker line. Take the smaller line and go through the loop and around the back of the bigger line and then pass it underneath itself. For a stronger hold, go around twice with the smaller line for a Double Sheet Bend.
Clove Hitch:
Sailors use clove hitches a lot, especially for securing fenders quickly (the cushions to prevent boat damage when docked or docking). Because you typically need to secure your fenders while on the move, this needs to happen quickly and smoothly. If you want to become your captain’s favorite crew member while on a sailing charter vacation, this knot is your ticket.
To tie a clove hitch, take your line around the rail, back up (hold it out), cross over the rope, then bring the end of the rope up through the middle. Note: this knot can slip, so once you’ve docked, we recommend that you go back to those fenders and retie them with a more secure knot.
One of the things we encourage anyone going on a sailing vacation to do is get their entire crew to play knot-tying games right away. Our favorite is the Fender Rodeo! Everyone needs to be able to tie a clove hitch knot to secure a fender, so make it fun and gain competence with sailing knots.
Round Turn and Two Half Hitches:
If you handed the average person a single line and asked them to tie a knot with one end, they would probably tie you a half hitch. With a single line, you make a loop, tuck the end of the line through that loop and pull it tight. Half hitch! This is NOT a secure knot, so if you need to tie a line to a stanchion (mast, piling, whatever) for example, you might use a round turn and two half-hitches.
To tie a round turn and two half hitches, you would wrap one end around the object (the working end), cross it behind the standing end (leaving a loop), go around the front, through the loop, and then tighten it to the tree. To make the second half hitch, you would take the working end again (which is now on the other side) and bring it behind the standing end (forming a loop), over the standing end, and through the loop. Tighten that up to the object.
Alternatively and for anchoring, you can use a similar knot, the anchor hitch/anchor bend.
Bowline:
The Bowline is known as the King of Knots, essential for any sailor! And for good reason: the bowline is strong, secure, versatile, and relatively easy to undo. Bowlines are typically used to tie sheets to the head and mainsail, but otherwise are used for hitching, mooring, and lifting.
This might be the most fun knot to learn because it has a fun little illustration to help you remember, the popular rabbit-comes-out-of-the-hole-and-runs-around-the-tree method. Make a loop with one end. Pretend your other end is a rabbit. From the bottom of the loop, have it poke up like it’s coming out of a hole. Go around the other end (the tree) and then back down into the hole.
Tip: if tying up to a piling in a tidal area or in stormy conditions, use a bowline on the piling so that it’ll ride up and down the piling…
Figure 8 Stopper Knot (or double overhand stopper knot):
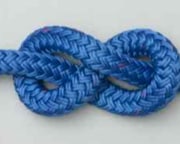
The stopper knot, if you remember from the blunder blog post we mentioned above, is often used to stop a line from pulling through an object. Or, often you may want to finish another knot with a stopper knot at the end for additional security. It’s an easy knot (as long as you remember to make it!). Make a loop so that the standing end is on top. Bring the working end around the standing and then up through the loop. When you pull it tight it starts to look like a figure 8.
Note: some sailors prefer the Double Overhand Stopper because it can be little beefier and less prone to jamming, but the figure 8 knot is popular and works well. The difference is really application and preference…
Rolling Hitch:
If you need to take tension and strain off a line, like if you’re dealing with a jammed/fouled/overlapped jib sheet, you will want to use a rolling hitch. Or, another common use is attaching a line to a pole. Hopefully, you won’t need to use this knot often with fouled lines, but when you do, you’ll really need it and will be glad you know how to tie it.
This sailing knot starts with a half hitch and then go back around the main line, passing over the first turn. When coming back around, make sure the line goes between the standing line and the first turn. Tighten up and then go back around the main one more time with another half hitch.
Tips: (1) be cautious when tying a rolling hitch to stainless steel as it may slip, and (2) a rolling hitch is typically used to tie a line to another line (or pole). If tying the line back onto itself, then a Midshipman’s Hitch (in bonus section) is recommended!
BONUS SAILING KNOTS
Midshipman’s Hitch:
This knot is useful for when you need to make an adjustable (but still secure) loop around something. The Midshipman’s Hitch is similar to the Tautline Hitch, a Boy Scout favorite, except that the Midshipman’s Hitch is considered more secure. It’s also similar to the Rolling Hitch described above – a notable difference with the Rolling Hitch is that the Midshipman’s Hitch is better for tying a line back onto itself (as opposed to a Rolling Hitch being tied to a pole or to reduce strain on another line).
Again, the advantage of a Midshipman’s Hitch is that it is secure under load and meanwhile adjustable. For example, in a pinch (or on small boats) a Midshipman’s Hitch can double as a Boom Vang (and throw in a Trucker’s hitch below to add a mechanical advantage).
Trucker’s Hitch:
The trucker’s hitch looks a lot more complicated than it really is. It’s used to tightly secure things, like a dingy to the deck, but the reason that it’s a common knot is that there are so many non-sailing uses as well. Once you learn the trucker’s hitch, you’ll find that you use it a lot. The knot creates a mechanical advantage (like a block and tackle, about 2:1 to 3:1 depending on fixed points) for greater tension, so use caution, as it can also break things with the mechanical advantage. You can finish the trucker’s hitch with other knots, like 2 half-hitches (like they do in the video below).
You’ve got your plans for the holiday season all sorted out now, don’t you?! Make sure you have some rope around and challenge family members to a knot race! See who can tie the fastest Bowline and let the winner eat the last piece of pie.
Guide To Buying a Boat
Know your knots? Know the rules? Know how to sail (including all the theory knowledge)? Got a NauticEd skipper certification? Then maybe it is time to buy a boat. Read the Choosing the Best Beginner Sailboat Guide written by our friends at RightBoat. At Rightboat you can buy an existing boat that is listed or you can list your own boat for sale.


